Sunday 29 April 2012

Puppy height chart

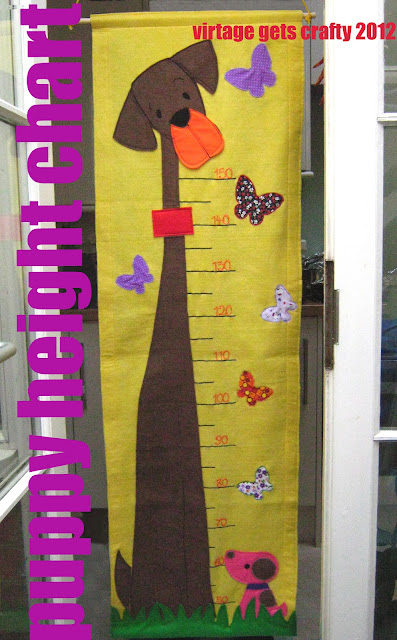
You'll remember from a couple of posts ago that I have being working on a coordinated puppy cot mobile and height chart for quite sometimes now...well, I finally completed the job, and can happily share the finished height chart, which I think is objectively well cute!

Felt features again heavily in this project as it is such a versatile and easy to use material. My only concern with felt was that, being hung, I wasn't sure it wouldn't twist and lose shape with time, so I decided to reinforce it at the back with ribbon all around the edges. I also inserted a wooden rod at the bottom to keep it straight, and I used another rod with two holes at the edges, through which I passed and secured a piece of yellow string to hang the chart.
The idea of this chart came from the puppies I designed for the puppy cot mobile, which feature in this post. The puppies were quite small, so I thought I would replicate one of those facing a big and tall dog, which  resembles a Great Dane. I love that breed, so I designed my big dog to capture the height and cuteness of Danes; its tall body is also the metre itself.


After freely sketching the borders of the Dane's face with a black Biro on the brown felt, I decided to leave the pen marks on, as they provide some depth to the picture, and a somehow cartoon-y finish.


To keep to the outdoor theme, I introduced the grass at the bottom of the chart and the fabric butterflies, inspired by this lovely My Mei Tai blog post appliqué technique.


I hand-sewn the details of the small dog using my beloved blanket stitch, to mirror the finish of the puppy cot mobile.


I thought lots about how to do the numbers of the chart. I searched for days on Pinterest for sewn numbers, but ended up writing them by hand, using the same pearl dimensional fabric paint I used to make the orange blossoms tablecloth. I think it would have been incredibly difficult to cut tiny numbers and sew them to the background, given the size of it. This solution is a happy compromise, I think.

On Pinterest I also found this clever and elegant height chart, that inspired my way of marking heights.
I've used safety pins instead of split pins (which I couldn't find anywhere), and made little tags out of cardboard. I wanted to make them a little special, so I inserted a little wooden bead in between the two knots of the cord.


Last night I finished and cleaned the heigth chart (felt attracts any little grain of dust and dirt, and you could see them especially well on the clear background! I was pleased to find out that you can easily brush any dirt off felt with a clean toothbrush), I hung it to take pictures and realised I loved making it so much that I really didn't want to give it away! But I know it will be loved just as much in its new home, by his new, sweet little owner Jessica...
Thursday 19 April 2012

Doll cloth nappy tutorial

This morning I had to put Little Miss' doll outfit in the washing machine. When she realised her "baby" was sort of naked, she kept on saying "baby nappy! baby nappy!", meaning "baby doesn't have a nappy!" (motherly understanding of obscure toddler language). So I thought: OK, let's make a miniature cloth nappy for the baby!


It was really quick and easy (in spite of Little Miss demanding to sit on my lap while I was sewing it...there is so much I can do when she is awake!), so let me share it with you in 10 easy steps.

***August 2013 update! You may want to check my updated version of the tutorial here before you start, and then decide which version suits you the most***

Materials:
  • Old small bath towel
  • Cotton fabric
  • A 3cm stripe of Velcro
  • a doll / teddy to put it on (please note: Little Miss' doll is long 26 cm head to toe and has a 22 cm waistline, if your doll / teddy is bigger / smaller you'll need to scale the measurements given to suit)

Step 1:

Draw on the towel the shape in the picture, using the measures given. I've used a pair of little doll's knickers to base my measurements on.

Step 2:

Fold the towel in two as illustrated and cut the shape drawn through the layers .

Step 3:

Shorten the flaps on one side only, cutting off 3.5cm from each flap.

Step 4:

Place the towel nappy on the wrong side of the cotton fabric, and cut the fabric all around following the towel shape and allowing 2 cm for the seam .

Step 5:

Reduce the seam bulk by cutting a few notches in the curve. Repeat on the other side.

Step 6:
Press the seam and stitch along the curve and all around the fabric cotton shape to make a 1 cm seam.

Step 7:
Pin the towel shape to the cotton fabric, fold the cotton fabric's seam on the towel shape and stitch them together.

Step 8:
Cut the Velcro stripe in half. Separate the Velcro and stitch a piece of rough side of the Velcro to each of the long flaps as illustrated.

Step 9:
Stitch the smooth part of the Velcro to the right side of the nappy as illustrated. Cut the corners of the Velcro as they may be a little too sharp.

Step 10:

 Lay the doll on the open nappy, towel face up, with the long flaps behind the doll's back. Secure the nappy to the doll with the Velcro.
I'm quite proud on how the nappy has a perfect bum fit!

That's it! When I presented Little Miss with the nappy and asked her: "Do you like it?", she was so happy and screamed: "Ti piace!" which is translated literally: "You like it!". Well, we get the meaning...


Monday 16 April 2012

Did you miss me? I was making a new puppy cot mobile...


I have been incredibly busy making stuff, of late. Which is good, as it makes me feel purposeful. Although that means also not much blogging, and a tiny bit of stress - remember? full time job, toddler, husband, etc.
In particular, I spent a considerable amount of time sewing a new puppy cot mobile for a friend's newborn goddaughter. I'm also in the process of making a coordinated height chart, which will hopefully be ready this week - I say hopefully because I've been hopeless in estimating timing for this project... I thought it would have been another 'nice 'n' easy' one, but since I've sewn most of it by hand, it has obviously taken me soooo long! But I was determined not to make the same mistake I made before by sewing everything by machine and losing a bit of that 'handmade' touch.
Remember my bird cot mobile? Well, I wanted the same low-tech system and retro feeling.
My friend's brief read simply: "Cute puppies and lots of warm colours, please", so I imagined a bunch of doggies playing in the park, and I started doodling what I wanted to recreate.

The puppy mobile and height chart project on paper
For the central piece, around which my puppies happily play, I have chosen to use the tree template published by Homemade by Jill because my last one was only "inspired" by it and ended up twisting a bit.
I have also chosen to use felt again (I can't get enough of the stuff!), as it is really easy to use and sew (no hems, hurrah!!!), beside giving an immediate playful and warm feeling.
About a month, and a thousand blanket stitches later (give or take), this is the result.


The height chart is coming along nicely, so stay tuned...

I still think about the Easter marble cupcakes...

Easter seems already far in my memories, but this afternoon I was going through recent pictures and my loving thought went to the marble cupcakes I made for Easter Sunday...Yum! They were really delicious, the vanilla and chocolate sponge was light and fragrant, and the vanilla and chocolate buttery icing guiltily rich...
I had been on a dairy-free diet for the previous couple of weeks, but these cupcakes threw any good behaviour nicely out of the window (and I haven't looked back yet!)


The recipe was taken from one of Hummingbird Bakery's recipe books, Cake Days. I tried a number of recipes from this book and they ALL came out delicious. These marble cakes, in particular, were put on the table at 3pm and at 3.05 were finished...
What's so special about cupcakes? To me, it's that  you have in your hands not a biscuit, not a slice of cake, but a whole cake. Just for you.

Tuesday 3 April 2012

Easter bunny ears tutorial

Little monkey's nursery REALLY keeps me on my sewing toes...
Wednesday all children are invited to go dressed up as an Easter character...well, bunny or chick, isn't it? Hopefully no children will go dressed as eggs...So I chose bunny.
While I was doing this little project, I got really excited and decided to make it a tutorial, so here it is:


Materials:

  • Pink felt (and other felt, colours of choice, if making a flower)
  • Fur (synthetic of course! no bunnies have been injured during this tutorial)
  • Thin metal wire


1. Cut 2 pieces of felt and 2 pieces of fur following the dimensions and shape indicated in the picture.
2. Fold and pin the felt pieces only as indicated and sew a dart on the wrong side. Cut excess fabric from the dart.


3. Sew together a piece of felt and a piece of fur as illustrated, but be careful to leave the bottom of the ear open. This gap will allow you to slot the metal frame in. Repeat for the other ear.

4. Optional (but very cute if the bunny ears are for a girl!): cut a flower from some contrasting-colour felt; I've made the centre by cutting a couple of felt circles and stitching them on the flower with a little button. Stitch the flower to one of the ears by hand.

5. With the metal wire, shape a headband with the bunny ears (I've used one of little monkey's headbands for measurements). Be careful to tie neatly the sharp ends of the wire, so that they are safe and cannot hurt.

6. Cut a rectangle of fur (approx 40 x 10 cm), fold in half vertically, and sew all around on the wrong side, but leave a gap in the middle, marking it with a couple of pins. The gap will allow the metal frame to be slotted into the fabric. Turn the fur tube to the right side.

7. Slot the metal frame into the bunny ears and the tube of fur. Sew by hand the ears to the tube of fur, all around the gap.
...and this is me, proudly sporting the finished Easter bunny ears at midnight...never mind tomorrow is another working day! :-/

Let me now how you get along making your very own Easter bunny ears for your next egg hunt...
and happy Easter, of course!